An Offline-First Todo List with Svelte, PouchDB and CouchDB posted Friday, May 10, 2019 by alex tipCouchDBdata
Today, we’re combining Svelte, the lean and fast frontend compiler, with PouchDB and CouchDB, and building a lightweight, Offline-First todo list app. It’ll sync your todos between multiple devices for offline use and also keep your data in a central backup database.
Why Svelte, and why PouchDB and CouchDB?
Svelte is a JavaScript frontend framework, except that it isn’t: the code you write looks like Riot or single-file components in Vue and has reactivity like React, but Svelte is a compiler, and as such adds zero frontend dependencies to your shipped code.
This means that Svelte is super slim and fast, making it suitable for very low-powered devices, like point-of-sale terminals. Since we’re always very interested in tools that let us build better software for less-than-perfect circumstances (old or underpowered devices, slow and intermittent connectivity), we decided to see how nicely Svelte would play with our go-to database combo of PouchDB and CouchDB. So, unavoidably, we built a quick offline-capable todo list.
A screencap from a demo video showing two instances of the app in different browsers, with one of them offline
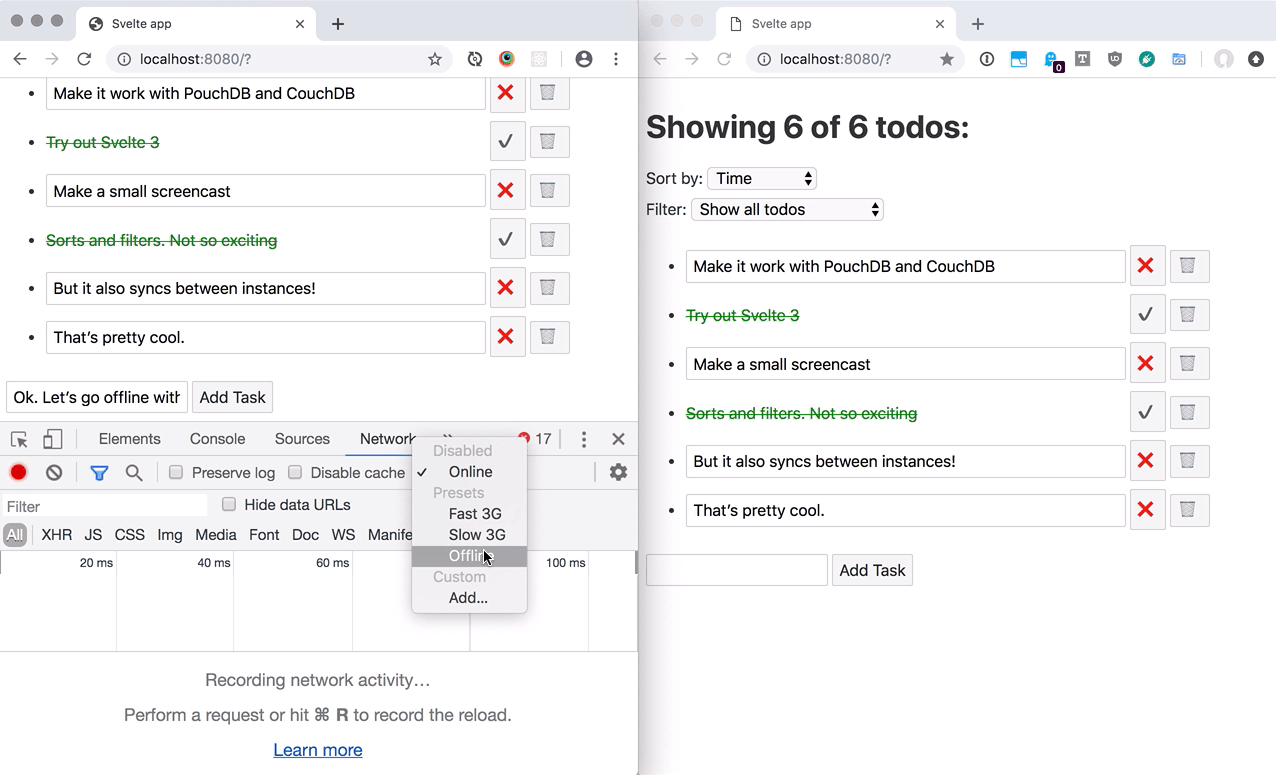
We promised to elaborate on that, so here we go!
Table of contents
- Why Svelte, and why PouchDB and CouchDB?
- Offline-First App Architecture
- What are we building?
- Prerequisites for building the project
- Step 1 - Basic todo-list with local PouchDB storage
- Step 2 - Sorting todos
- Step 3 - Filtering todos
- Step 4 - Adding offline capability with sync to CouchDB
- Step 5 - Make the todo item text editable
- Step 6 - Style and animate list items
- Step 7 - Add a loading message
- Conclusion
Offline-First App Architecture
If you’re unfamiliar with the paradigm, Offline First means that your data is stored on-device first and then, whenever possible, synced to a remote database. In our case, the remote database is CouchDB, and the local, on-device database is PouchDB, a JavaScript implementation of CouchDB. It’s capable of using CouchDB’s very robust syncing protocol to keep the two databases consistent with each other. “Very robust” means: it just works. The network may be slow, intermittent, or entirely absent, but eventually, the data will get there.
Helpfully, if your frontend code only ever talks to a local database, your database calls can never fail when you’re offline. This means we won’t be writing any special code to handle the offline case, because with PouchDB and CouchDB, this just works™️.
So, to recap:
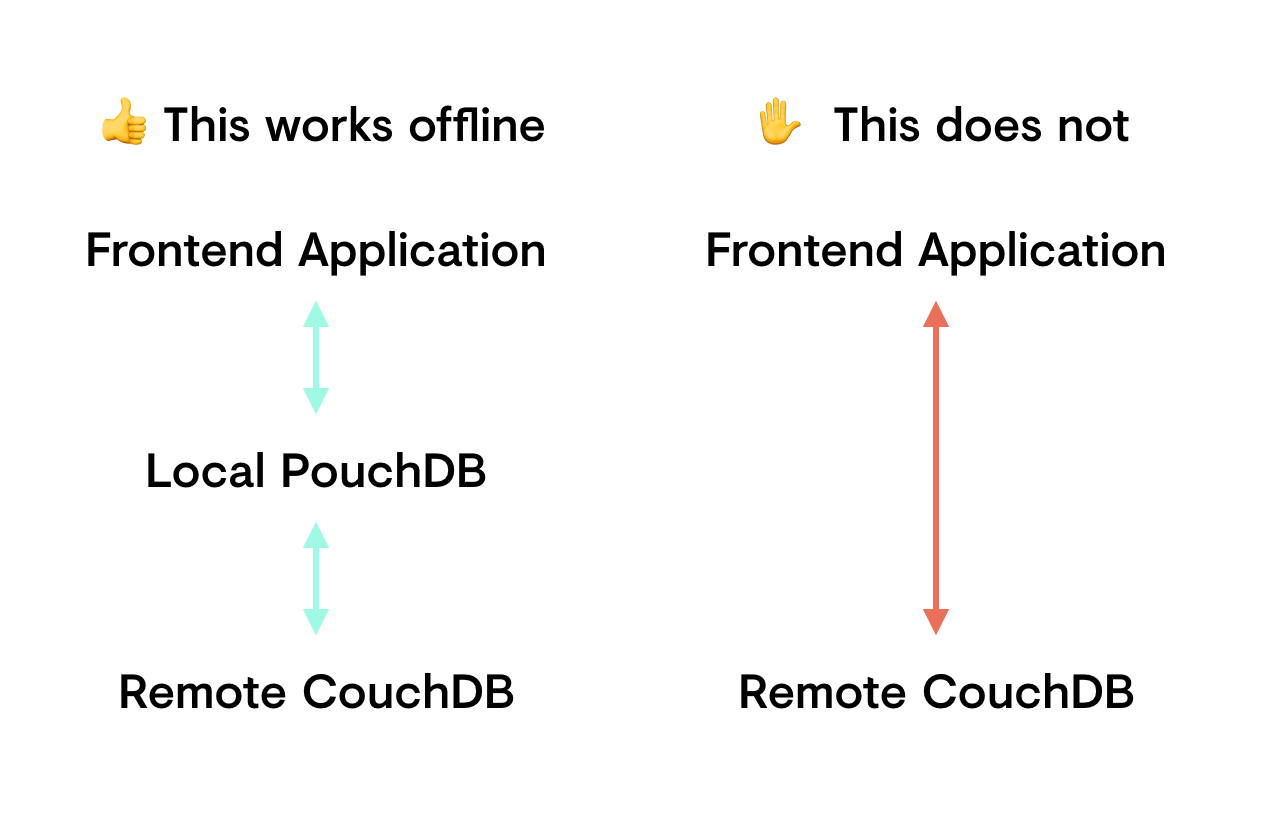
The tradeoff is that you have an additional layer that occupies storage space on each device, but the benefit is network independence and super-fast read and write speeds, because your frontend’s database requests aren’t going to us-east-1, they’re going to your pocket (or desk). So in addition to offline capability, you also get predictable and fast UI responsiveness when you’re online, too.
What are we building?
A small todo list app that also works offline. You can try out the final state here. Note that we didn’t connect a CouchDB to this, so there won’t be any syncing between instances, but if you have a CouchDB running locally, it will use that.
The code for the app is on GitHub, and each step of this post has its own tag there. We’ll link those individually below.
Prerequisites for building the project
If you want to build along, you’ll need Node.js with npm and, if you want to try the syncing between instances, a running CouchDB on your machine. The code will run fine without it though, that is the whole point of Offline First, after all.
Click here to show details on installing and setting up your local CouchDB instance
To install CouchDB on MacOS, grab an installer from the official CouchDB page, run it, and then start CouchDB.
There are also separate installation instructions for Linux and Windows.
⚠️ Note that your local CouchDB must have CORS enabled. To do this, open the database admin dashboard config page in your browser, click on CORS in the submenu, and then on the Enable CORS button.
The code will expect a CouchDB database called svelte-todo-db. After starting CouchDB, there’ll be a little couch icon in your menu bar, in it you’ll find Open admin console. Click that to open the database admin dashboard in your browser. Click Create Database and give it a name, say svelte-todo-db. Alternatively, open the CouchDB admin dashboard via this link and then add the database.
You can get the code for the todo app itself from GitHub. Clone it and run npm i. We’re only adding two dependencies, pouchdb-browser and lodash.
Run the code with npm run dev.
Step 1 - Basic todo-list with local PouchDB storage
If you want to follow through the steps, each one is a tag you can check out. Step 1 is git checkout step-1, and the other steps just increment the number. You can also look at step 1 on GitHub.
⚠️ Note that the following code examples are only excerpts from the respective steps, not the entire files. We’ll also be skipping CSS entirely.
Step 1 is going to be fairly long, as it sets up the whole project and introduces a lot of CouchDB and Svelte concepts, and shows how to use PouchDB. The subsequent steps will be a lot shorter.
Setting up PouchDb for local use and adding todos
First off, we need a way to put new todos into our local database. Instantiating a new PouchDB and adding something to it is only two lines:
new PouchDB("db");
db.post({
  /* a todo object */
});
Just to make it explicit: CouchDB (and therefore also PouchDB) is a document-based database, so we can just send it a JavaScript object, and it will happily store it as JSON.
Confused about why we use the words PouchDB and CouchDB interchangeably sometimes? Click here.
It’s a bit tedious to write a PouchDB/CouchDB document all the time, so this post is inevitably going to use PouchDB and CouchDB interchangeably at some point. That’s OK: PouchDB is an in-browser JavaScript implementation of CouchDB, and they can seamlessly share data. So a PouchDB document is also CouchDB document. Later in the post, the documents will live in both database types at the same time, and the distinction will become pretty much meaningless. So don’t let it confuse you if we put CouchDB documents into a PouchDB: that’s one of the reasons PouchDB exists in the first place.
Now, db.post() does a noteworthy thing here: it decides on a unique _id for the todo document for us. Generally, you’d want to construct the _id value for CouchDB documents carefully, because clever a _id scheme can save you a lot of time and effort later. However, we’ll skip this topic for now and revisit it in the next blog post. Just know that a generated _id will look something like this: 1341f2d6-3395-4b23-bc2c-569269a59075.
Here’s everything that has to do with adding a todo:
<script>
  import PouchDB from "pouchdb-browser";

  let db = new PouchDB("db");

  let todos = [];
  let newTodoText = "";

  async function add(event) {
    const newTodo = {
      text: newTodoText,
      complete: false,
      createdAt: new Date().toISOString(),
    };
    const addition = await db.post(newTodo);
    if (addition.ok) {
      // Fetch all todos from the local DB again
      // await updateTodos()
    }
    newTodoText = "";
  }
</script>

<form on:submit|preventDefault="{add}">
  <input type="text" bind:value="{newTodoText}" />
  <button type="submit">➕ Add new task</button>
</form>
As you can see, the values we’re storing in each new todo are the todo’s text, whether the todo is complete or not, and the date it was createdAt. These three values together make up the todo document, and the database adds an _id value for us. It also adds a value called _rev, which we’ll talk about later. So a new todo document will look a bit like this in the database:
{
  "_id": "1341f2d6-3395-4b23-bc2c-569269a59075",
  "_rev": "1-93f5aa1183574b71c37b332496e49446",
  "text": "Hello everyone",
  "complete": true,
  "createdAt": "2019-05-11T16:50:37.648Z"
}
The Svelte part of this code features event handling with on:submit, along with the very practical |preventDefault modifier, as well as variable binding with bind:value={newTodoText}. Whenever newTodoText changes, all of its instances are updated, for example: after saving the new todo, the text field with todo text should be emptied again, which we do with newTodoText = ''.
Inside the add() handler, after a successful db.post(), we’ll be refreshing the as of yet nonexistent list of todos by bluntly reloading all todos from the local database with await updateTodos(), which we’re going to write next.
Fetching all todos from the local database
For now, todos are the only thing we’re going to be storing, so we can get them with the db.allDocs() method, which… fetches all docs. Note that we’re passing in include_docs: true, otherwise we’d just be getting the document IDs, not the actual documents. The documents themselves will be in an array of objects in the response, called rows. We don’t need the metadata included in each row, just the actual database document, so we map over the rows and extract the doc from each row into our todos array.
async function updateTodos() {
  const allDocs = await db.allDocs({
    include_docs: true,
  });
  todos = allDocs.rows.map((row) => row.doc);
}

onMount(async () => {
  await updateTodos();
});
In the add() handler, we used await updateTodos() to refresh the local store after adding a new todo, which doesn’t seem like the most efficient way of doing this kind of thing. But this is disk access, not network access: the database is on the same device, so we’re not really worried about latency.
I’d really like to know how to do this the more efficient way though.
Instead of re-fetching all todos from the local database, we could be writing custom code to just add that one new todo to the existing state (think Redux reducers). For this example, it’s really not worth the effort, but if you do want to go down that route, be aware that newTodo doesn’t contain the same data as the corresponding doc in the database: CouchDB will add an _id and a _rev, as you saw previously.
You’re really going to need _id and a _rev for updating and deleting documents later, so you’ll have to add them to the local state of that new todo. Usefully, they’re included in the response objects from post() and put(). And don’t worry, we’ll get into what on earth _rev does in a bit.
Displaying Todos
Now that we’ve got a way to add and fetch todos, let’s make them visible:
<script>
  import TodoItem from "./todo-item.svelte";
</script>

<ul>
  {#each todos as todo}
  <TodoItem todo="{todo}" on:remove="{removeItem}" on:update="{updateStatus}" />
  {/each}
</ul>
Aside from using the fairly standard {#each} iterator, we’re doing three more Svelte-specific things:
- Including the
TodoItemcomponent - Passing each
todoobject into the component - Registering two custom event handlers,
on:removeandon:update
We’ll check out how those are called in a bit, for now, let’s see what they’re calling:
async function updateStatus(event) {
  const { todo } = event.detail;
  const update = await db.put(todo);
  if (update.ok) {
    await updateTodos();
  }
}

async function removeItem(event) {
  const { todo: todoToRemove } = event.detail;
  const removal = await db.remove(todoToRemove);
  if (removal.ok) {
    todos = todos.filter((todo) => {
      return todo._id !== todoToRemove._id;
    });
  }
}
For updating, we’re using db.put() and passing in a whole todo doc that we’ll be getting from the TodoItem component. Once that succeeds, we’re reloading all todos from the local database with await updateTodos() for brevity, as we did in the add() handler.
db.remove() also takes an entire todo doc, but what it really only cares about are the _id and _rev values in that object. But we’ve got the whole doc handy, so why not use that?
If the removal succeeds, we’re not going to reload the local database this time, we’re going to remove the todo from the local state ourselves. Why? Because we don’t need to bother reconstructing the doc as we would with add or update, here, we can just throw it away.
Now let’s briefly look at the todo-item.svelte component, and then we’re done with step one!
The TodoItem component
First off, the markup: our todo can be completed, and it should look different if it is. Also, once it’s completed, the status button should toggle it back to incomplete. On top of that, there’s a button to remove the todo. All of this only uses the on:click event handlers Svelte provides.
<li>
  {#if todo.complete}
  <span class="is-complete">{todo.text}</span>
  <button on:click="{toggleStatus}">❌</button>
  {:else}
  <span>{todo.text}</span>
  <button on:click="{toggleStatus}">✔️</button>
  {/if}
  <button on:click="{remove}">💥</button>
</li>
The corresponding JavaScript has a nice trick up its sleeve: custom events.
<script>
  import { createEventDispatcher } from "svelte";

  const dispatch = createEventDispatcher();

  function remove() {
    dispatch("remove", { todo });
  }

  function toggleStatus() {
    dispatch("update", {
      todo: {
        ...todo,
        complete: !todo.complete,
      },
    });
  }

  export let todo;
</script>
At the bottom we pick up the todo prop we passed in previously, and above that, we have our two event handlers, one for remove and one for toggleStatus. They both use Svelte’s EventDispatcher to fire component events into Svelte’s event bus, and we’ve already seen how these are picked up by the parent component earlier in this step:
<script>
  async function updateStatus(event) {
    const { todo } = event.detail;
    const update = await db.put(todo);
    if (update.ok) {
      await updateTodos();
    }
  }
</script>

<TodoItem todo="{todo}" on:update="{updateStatus}" />
With on:update, we listen to the custom event dispatched by the TodoItem component, and with updateStatus we handle it. Each dispatched event has a name and detail: dispatch('remove', {todo}), and we’re passing in the entire todo doc as the detail.
And that’s it, step one is complete: a simple todo list with local data storage that lets you add, remove and toggle todos. Next up: some Svelte magic for sorting and filtering the todos.
Step 2 - Sorting todos
If you want to follow through the steps, each one is a tag you can check out. Step 2 is git checkout step-2, and the other steps just increment the number. You can also look at step 2 on GitHub.
This step and the next only deal with Svelte and show more examples of variable binding as well as Svelte’s very neat reactive declarations.
All of this takes place in the parent component. Let’s add a <select> element for sorting first:
<div>
  <label>Sort by:</label>
  <select bind:value="{sortByWhat}">
    <option value="createdAt">Time</option>
    <option value="text">Todo text</option>
    <option value="complete">Completion</option>
  </select>
</div>
Further up, we declare a variable to hold the current sort key, sortByWhat, and then we need to actually apply that to our collection of todos.
import { sortBy } from "lodash";

let sortByWhat = "createdAt";

$: sortedTodos = sortBy(todos, [sortByWhat]);
So, we bind the value of the <select> element to sortByWhat, and the reactive declaration $: sortedTodos refreshes sortedTodos whenever any of the variables referenced in the right side of the assignment change. In the {#each} block, we now need to iterate over our new sortedTodos instead of the regular todos like before. And that’s it. Switching the <select> changes sortByWhat, which changes sortedTodos, which re-renders automatically.
Now, let’s kick this up a notch:
Step 3 - Filtering todos
If you want to follow through the steps, each one is a tag you can check out. Step 3 is git checkout step-3, and the other steps just increment the number. You can also look at step 3 on GitHub.
Filtering means the ability to show either completed or uncompleted todos, or all of them. This is quite similar to sorting, first we add another <select>:
<div>
  <label>Filter:</label>
  <select bind:value="{filterByWhat}">
    <option value="">Show all todos</option>
    <option value="complete:true">Show completed todos</option>
    <option value="complete:false">Show open todos</option>
  </select>
</div>
We’ll just be a bit clever here and encode both the key we’re filtering and the value that key needs to have into a single string, like complete:true, because that lets us use the same markup as with sorting above. Now in the JavaScript, we extend our reactive declaration to also do the filtering in the same assignment:
import { sortBy } from "lodash";

let sortByWhat = "createdAt";
let filterByWhat = "";

$: sortedAndFilteredTodos = sortBy(todos, [sortByWhat]).filter((todo) => {
  const [filterKey, filterValue] = filterByWhat.split(":");
  // Only filter if there’s a proper filter set
  return filterKey && filterValue
    ? todo[filterKey].toString() === filterValue
    : true;
});
Again, the reactive declaration ensures that sortedAndFilteredTodos gets updated whenever any of the variables in the assignment change. So all we need to do now is change the {#each} block to iterate over our new sortedAndFilteredTodos, and we’re done.
Now, on to the really nifty part:
Step 4 - Adding offline capability with sync to CouchDB
If you want to follow through the steps, each one is a tag you can check out. Step 4 is git checkout step-4, and the other steps just increment the number. You can also look at step 4 on GitHub.
This step covers connecting the remote CouchDB, making the app work offline, and syncing multiple instances of the app. For that, the necessary code is almost worryingly short. Once you’ve got CouchDB running locally and have created a database called svelte-todo-db, here’s how you set up the sync:
let db = new PouchDB("db");
const replication = PouchDB.sync("db", "http://localhost:5984/svelte-todo-db", {
  live: true,
  retry: true,
})
  .on("change", async function (info) {
    await updateTodos();
  })
  .on("error", function (err) {
    console.log("Replication error:", err);
  });
Done. Time for lunch.
No, seriously. That’s it. We need to tell PouchDB where the CouchDB that it’s supposed to replicate to is, and that it should do continuous replication (PouchDB calls this live). This keeps both databases in sync continuously. The replication emits a bunch of useful events, but for now we’re only interested in whether something changed or whether something broke (and even that is optional). Whenever a change comes in from the server-side CouchDB, we re-fetch and re-render the todos, as we’ve done a bunch of times before. And for a proof of concept, that’s honestly all there is. Every thing else will work as before. Open the app in a second, different browser, add, toggle and remove some todos, go offline with one of the browsers, keep using the app, go back online, it’ll all work and both instances will sync up automatically. And it will all work with no extra code.
Sounds too good to be true? Good, because it is. There’s a catch: we’ve now entered the realm of (sinister voice) distributed computing. Things will only work nicely as long as you don’t make multiple changes to the same todo at the same time, for example when one instance is offline. If the online instance A deletes a todo, and the offline instance B marks it as completed, it will magically reappear for A when B comes back online. Later, when we do more complex operations on the todos, like changing their text, it’s possible that A and B will make different changes to the same todo at the same time, which will produce a conflict.
Conflict handling and resolution is the price you have to pay for offline capability and never losing any data. In a MySQL database, for example, if you get two updates to the same record, the second one overwrites the first, and the first is lost forever. On top of that, the author of the first change won’t notice until it’s too late, and nobody will ever be able to reconstruct what happened.
In CouchDB, both changes are recorded as having caused a conflict: the database cannot logically decide which of these changes it should prefer, so it keeps both for humans to sort it out later. This also implies that you, the developer, need to provide the humans with the means to actually do this. Discussing conflicts would completely inflate this already epic post, so we’ll deal with that topic in a future post. For now, let’s add a bit more polish to the todo list and make the todo texts editable.
Step 5 - Make the todo item text editable
If you want to follow through the steps, each one is a tag you can check out. Step 5 is git checkout step-5, and the other steps just increment the number. You can also look at step 5 on GitHub.
We don’t need to do that much to achieve this step’s goal, other than adding an <input> element and binding its value to our todo object’s text key. One thing we need to consider more carefully is how we trigger saving the change: we could save on every keystroke, but that leads to weirdness when typing fast: refreshing the list can be slower than your keystrokes, which leads to some characters disappearing. There are a number of ways to solve this, but we’ve opted for debouncing: updateText() will only run 500ms after it was last called.
<script>
  import { debounce } from "lodash";

  function updateText() {
    dispatch("update", { todo });
  }

  const debouncedUpdateText = debounce(updateText, 500);
</script>

<li>
  {#if todo.complete}
  <input class="is-complete" value="{todo.text}" disabled />
  <button on:click="{toggleStatus}">❌</button>
  {:else}
  <input
    type="text"
    on:keyup="{debouncedUpdateText}"
    bind:value="{todo.text}"
  />
  <button on:click="{toggleStatus}">✔️</button>
  {/if}
  <button on:click="{remove}">💥</button>
</li>
We don’t need to make any changes to the parent component, since both the event handler for changing the text and the handler for changing the todo’s status dispatch the same event, update, and both pass in the whole todo object.
Step 6 - Style and animate list items
If you want to follow through the steps, each one is a tag you can check out. Step 6 is git checkout step-6, and the other steps just increment the number. You can also look at step 6 on GitHub.
This is a short step that introduces Svelte’s very robust transition and animation system. In the repo, we’ve also added a bunch of CSS to make the list look a bit nicer, but we’re not going to elaborate on that.
We’d like to have new todos fade in in their correct position, and removed todos fade out nicely. Svelte includes transition directives to do this sort of thing directly in the markup. In the <TodoItem> component, we just add a transition:fade directive to our list item:
<script>
  import { fade } from "svelte/transition";
</script>

<li transition:fade>
  {#if doc.complete}
  <input class="is-complete" value="{doc.text}" disabled />
  <button on:click="{toggleStatus}">❌</button>
  {:else}
  <input type="text" on:keyup="{debouncedUpdateText}" bind:value="{doc.text}" />
  <button on:click="{toggleStatus}">✔️</button>
  {/if}
  <button on:click="{remove}">💥</button>
</li>
There’s one little extra consideration we need to make, namely that our list items have to fade in and out in their correct list position, and this currently doesn’t happen. We can ensure this by adding an index to the end of the {#each} iterator: {#each sortedAndFilteredTodos as todo (todo._id)}. Now Svelte can tell the list items apart and keep them in their correct places while animating.
<ul>
  {#each sortedAndFilteredTodos as todo (todo._id)}
  <TodoItem todo="{todo}" on:remove="{removeItem}" on:update="{updateStatus}" />
  {/each}
</ul>
Step 7 - Add a loading message
If you want to follow through the steps, each one is a tag you can check out. Step 7 is git checkout step-7, and the other steps just increment the number. You can also look at step 7 on GitHub.
Finally, we’d like to show a simple little loading message on startup, so you’re not looking at Showing 0 of 0 todos for a second. Svelte ships with a super-useful await block that can display loading and error messages as well as the result of any promise, but this would happen every time we re-fetch the local DB, which isn’t ideal. So we went for a simpler approach, and tracked the loading state in an extra variable:
<script>
  let isLoading = true;

  async function updateTodos() {
    const allDocs = await db.allDocs({
      include_docs: true,
    });
    todos = allDocs.rows;
    isLoading = false;
  }
</script>

{#if isLoading}
<h1>Loading your todos…</h1>
{:else} {#if todos.length === 0}
<h1>Zero Todos! Nice ✊</h1>
{:else}
<h1>Showing {sortedAndFilteredTodos.length} of {todos.length} todos</h1>
{/if} {/if}
This has the added benefit of making it clear that some todos may be invisible because of an applied filter. And with that, we’re done!
Conclusion
In just a bit over 150 lines of markup and Javascript, we’ve arrived at a small todo app that:
- lets you add, toggle, edit and remove todos
- lets you also sort and filter them simultaneously
- works offline
- syncs multiple instances of the app
- backs up to a remote database
We think that’s a pretty great start, and we’re going to continue with more posts on data synchronisation, document design, Offline-First architecture and CouchDB specifics soon. Until then, please experiment with this setup, ask questions on GitHub or Twitter or send us a fork if you’ve found a better way to solve any of the issues covered in this post.
Thanks and see you next time! 👋 💙
Wait, so what is _rev?
Good catch. _rev is the document revision that every CouchDB document has, and it looks a bit like this: 1-93f5aa1183574b71c37b332496e49446. The number before the dash is the update number (so 1 is the original document, 4 would be the same document after the third change to it). The bit after the dash is a hash of the document’s content. CouchDB generates these so it can quickly and efficiently compare versions of documents across multiple distributed instances of the same database. _rev is therefore also the mechanism by which CouchDB can determine whether an update causes a conflict or not, and also allows it to automatically merge identical simultaneous changes.
This is why db.put() and db.remove() require you to pass in not only the _id of the document you want to change, but also the _rev: CouchDB doesn’t just need to know which document you’re referring to, but also to which point in that document’s history.
So revisions are used to guarantee the order of operations in the database. In distributed systems, each system has it’s own clock, and they’re probably not all perfectly in sync. Combine that with the fact that transmission across larger physical distances takes significant amounts of time, and you’ll find yourself in a situation where dates and times become unreliable indicators of when something happened. So instead of relying on a timestamp to determine the order of changes, CouchDB works a lot more like git, where each change points to a previous change, in an unbroken chain (or tree, if you have conflicts) all the way back to the beginning.
_rev also plays a role in guaranteeing CouchDB’s impressive resilience, making the database so robust that you can literally unplug the database server’s power while it’s in operation and be certain that you can just boot it up again and keep going where you left off immediately, with all existing data intact. But that’s a topic for another future post.
For now, we hope we’ve kindled an interest in Offline First and the various technologies presented here. We’re great enthusiasts of CouchDB and PouchDB, and we’ve been actively involved in CouchDB’s development for over a decade now. Svelte has also impressed us a lot in this short time, and we hope to continue exploring its capabilities.
So now, for realsies: bye! 🚀
« Back to the blog post overview